How to Build a Homemade Jaw Crusher
Building a rock crusher at home is a significant project suited for those with mechanical aptitude, welding skills, and a clear understanding of safety. The most feasible DIY design is a simple, manual-operated jaw crusher. This guide outlines the principles and steps based on proven, low-tech designs used by hobbyists and small-scale prospectors.
Important Disclaimer: This project involves significant risk. Flying rock chips, dust, and mechanical failure can cause severe injury or death. Always wear certified safety glasses, a face shield, heavy gloves, hearing protection, and a respirator when testing or operating the crusher. Operate it in a controlled, isolated area away from others.
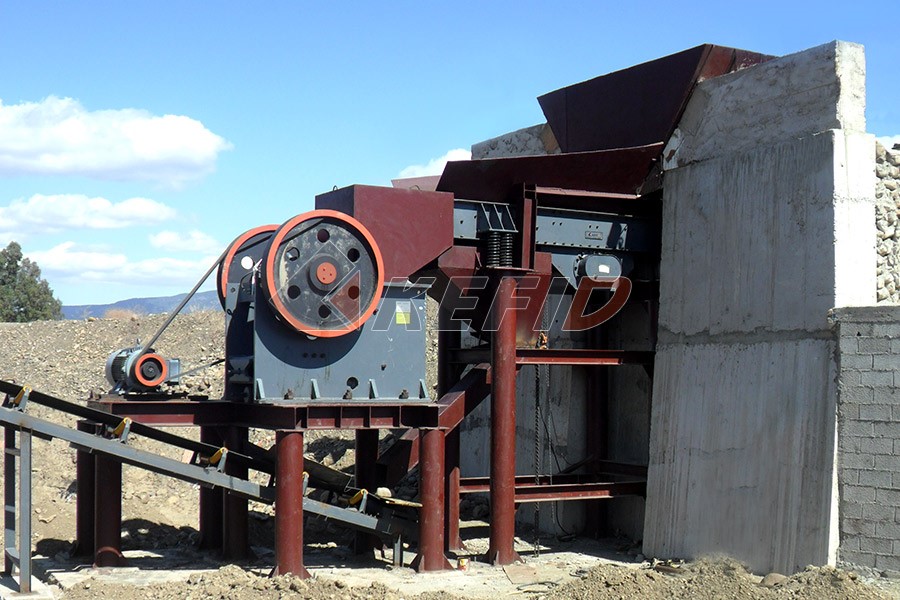
Core Principle: A jaw crusher works on the “toggle” principle. Two vertical plates—one fixed (stationary jaw), one moving (swing jaw)—form a “V” chamber. The moving jaw exerts immense mechanical force on rock placed in the chamber, crushing it against the fixed jaw until it is small enough to fall out through the adjustable gap at the bottom (the closed-side setting).
Materials & Tools Required:
- Frame & Jaw Plates: Use thick steel plate (minimum 1/4 inch or 6mm). For the crushing surfaces (jaw dies), hardened steel is critical. Common DIY solutions include using hardened steel wear plates from industrial equipment or even large truck axle shafts cut lengthwise.
- Eccentric Shaft & Bearings: A solid steel rod for the shaft and heavy-duty pillow block bearings to support it.
- Toggle Mechanism: Steel plates for the toggle seat and toggle plate itself. The toggle plate is a safety component designed to break if uncrushable material is encountered.
- Flywheel: A heavy wheel (can be cast iron or steel) to store inertial energy for smoother crushing.
- Drive System: An electric motor (typically 5-10 HP for small-scale) with appropriate RPM, V-belts, and pulleys to reduce speed and increase torque.
- Construction Tools: Welder (MIG or ARC), angle grinder with cutting/discs, metal drill press wrenches.
Construction Steps:
- Design & Planning: Sketch your design with dimensions. Key calculations involve the desired feed opening size (e.g., 4″x6″) and the mechanical advantage needed. The pitman (the moving arm connecting the eccentric shaft to the swing jaw) must be robust.
- Build the Main Frame: Weld the frame from thick steel channel or plate to form a rigid box that will house all components. It must absorb intense vibration without flexing.
- Fabricate and Mount Jaw Plates:
- Cut the stationary jaw plate and weld it securely to one side of the frame.
- Fabricate the swing jaw from heavy plate. It should pivot from an overhead point near its top rear.
- Securely bolt or weld your hardened steel jaw dies onto both jaws. The surfaces often have vertical corrugations (teeth) to grip rock.
- Install the Eccentric Shaft & Pitman:
- Mount your pillow block bearings onto the frame.
- The eccentric shaft runs through these bearings. Its center is offset at the point where it connects to the pitman.
- The pitman is attached to this offset section so that as the shaft rotates, it creates an oscillating motion in the pitman’s top end.
- Connect the bottom front of this pitman to your swing jaw.
- Install Toggle Plate & Seat:
- A toggle seat is mounted on the frame behind and below swing jaw.
- The toggle plate fits between this seat and a similar block on swing jaw acting as both a pivot point adjuster for bottom of swing jaw’s travel path—and primary safety shear pin protecting other parts if overload happens by breaking first when excessive force applied
- Add Flywheel & Drive:
- Mount heavy flywheels on both ends of eccentric shaft outside bearings; they help maintain momentum through each crushing stroke making process more efficient reducing peak power demand from motor
- Install motor mount bracket
- Use V-belts/pulleys connect motor drive one end of shaft; choose pulley sizes so final rpm at crusher’s eccentric between 250-350 RPMs—slow speed generates higher crushing force
- Adjustment Mechanism: Implement method adjusting closed-side setting determining final product size; simplest way involves inserting/removing shims behind toggle seat block moving whole assembly forward/backward relative swing-jaw’s bottom travel limit
8.Fabricate sturdy feed hopper directing rocks into top chamber safely keeping hands away
Testing & Operation:
Start with empty run checking all parts move smoothly without binding Listen for unusual noises Gradually test soft brittle material like cinder blocks before attempting hard granite Adjust tension belts ensure proper alignment Never force-feed material; let crusher draw rocks in naturally Keep size feed smaller than feed opening width
Remember this tool inherently dangerous requires constant respect maintenance Regular inspection welds bolts wear surfaces essential part ownership While homemade crushers can built successfully they rarely match efficiency durability commercial units intended heavy use Consider cost time building versus buying small used unit may more practical many cases